As the weather cools and Halloween candy takes center stage, it is the perfect time to mix things up with hands-on fall science activities. These engaging lessons, from pumpkin STEM activities and monster genetics to slime activities and dry ice experiments, are designed to excite and challenge your middle school science students. If you are looking for fun and memorable fall science experiments, this collection will keep your students learning and loving science all season long.
Fall Science Experiments for Middle School Science Activities
Below you will find a variety of activities that are perfect for your science classroom. They have been divided into activities for life science and activities for physical science. First up are the activities that are great for your life science or biology classes. After those, you will find activities that are great for your physical science, physics, or chemistry classes. Find the one that works for you.
Fall Science Experiments for Life Science and Biology
Pumpkin Science Activity: Zombie Science & Decomposition in Fall
If you carve a pumpkin and live in a warm climate, you know that it will not last long. In a day or two, your beautiful jack-o-lantern will look more like the night of the living dead with mold growing on it and its face starting to cave in. However, what if it could last longer? What if instead of it lasting a day, it could last a whole week? Have the students research different ways to stop the decaying process of carved pumpkins and then plan how to test the various solutions. As a class, you could decide on 3-4 solutions that they will try. Then they could each bring in their pumpkins. You could have them carve them in class or require that they carve them the night before at home. Once they are carved, the students could apply the various solutions to the inside and outside of the pumpkins and then place them in a safe location where they can observe them every day. You can decide on the time frame. I suggest 3-4 days. In the end, the students could develop a grading criteria and judge which solution was the best at slowing down the process. This is also a great time to discuss decomposers and the process of decomposition.
Monster Genetics: Fun Fall Science Activities with Punnett Squares
What is better than having students create their monsters while practicing their Punnett square skills? Students will be given the parents’ traits and, then they have to cross the traits to determine four of the possible offspring the parents can create. Will the children have claws or webbed hands? Will they have square heads or circle heads? Students can be creative with their actual monster designs as long as they follow the given traits. In the end, you could hold a monster party and have students show off their monster families.
Pumpkin Science: Living vs Nonliving & Photosynthesis Planting Activity
We have all seen the growing plants in a ziplock bag, but what about a pumpkin. If you are doing a unit on photosynthesis or living things during the fall, then you could let students grow plants but use a pumpkin as the container. Here is what you will need:
- fast growing seed like sweet alyssum, marigold, cosmos, zinnias, or sunflowers
- small pumpkin: about the size of your hand
- potting soil
- spray bottle with water.
Start by cutting a hole in the top of your pumpkin and then scope out the inside. Then add your potting soil and your seeds. Use the spray bottle to add water so that the soil is moist, but it is not saturated. Place the pumpkins in a sunny location and make sure to water them every day. After about a week, the students should see the beginnings of their plants. You could use their pumpkin planters to talk about living vs. nonliving, photosynthesis, cells, or other life science topics. The students can then take them home and plant the pumpkins in their garden. The pumpkin will eventually break down and act as fertilizer for their new plant.
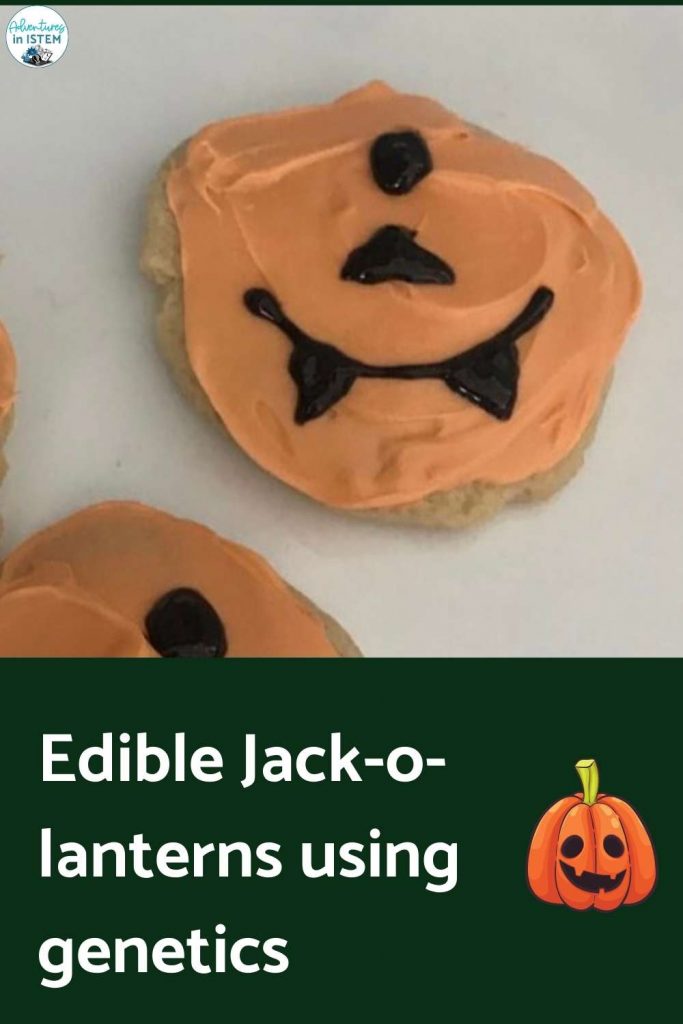
Pumpkin Genetics: Inheritance with Cookies & Punnett Squares
Creating pumpkins that you can actually eat while learning about genetics, heck yes! For this activity, students will flip a coin to determine the genotypes and phenotype of their pumpkin. They will then create their pumpkin using a sugar cookie and frosting. They will pipe on the face based on their pumpkin’s phenotype. You can then have two students work together to cross their pumpkin cookies and create a pumpkin family. Many of my students have never decorated a cookie before, so this was a new experience for them. They enjoyed decorating their cookies but enjoyed eating them even more.
Fall Science Experiments for Physical Science, Chemistry, and Physics
Slime Activities for Fall: Hands-On Chemistry Fun for Middle School
Most middle schoolers still enjoy playing with slime. This one is edible, although it might not taste too great, and students should learn to not taste experiments in science class. Here is what you will need:
- 4 grams of soluble fiber (example: Metamucil)
- 240 ml of water
- green food coloring
Pace the fiber and water into a large, microwave-safe bowl. Microwave it on high power for 3 minutes, stir, repeat for another 3 minutes and stir again. If it is not the consistency, you will want to repeat the process of microwave for 1 minute and then stirring until it is the consistency you prefer. Once you have the consistency you like, add a few drops of green food coloring. You could also do this over a hot plate in a large 600ml beaker making sure to stir every few minutes.
Store the ectoplasm in a zipped bag so that it lasts through the week. For cleanup, just use warm soap and water.
Fall Science Experiments: Color-Changing Dry Ice Reaction
Dry ice is great to use as a demonstration but can be even more exciting when it makes the liquid turn color. Dry ice is pure carbon dioxide in solid form. It is considered an acid, so it is excellent to use with a universal indicator. You could do this experiment as a demonstration during your acid/base unit or chemical reaction unit. Here is what you will need:
- large test tube, beaker, or flask (the larger ones are more dramatic)
- water, enough to fill 75% of the container
- 1 ml of ammonia
- 2 ml of Universal indicator solution
- 3 dry ice nuggets (should be able to fit into your container)
- 3 drops of 1 mol of hydrochloric acid (this could be ommitted)
Fill the water into the container. Then add the universal indicator solution and the ammonia. This should turn the water purple if it does not, then keep adding one drop of ammonia at a time until it does. Have the students record their observations of what they see before the dry ice is added. Now add the dry ice. The students will see the dry ice quickly sublimate, and the solution should turn from purple to green to orange. If you want it to go through the full-color change, you could add three drops of hydrochloric acid. This will cause the solution to turn red. You could also do this activity with bromothymol blue if you do not have a universal indicator. The solution will go from a dark blue color to green and then finally to yellow.
Dry Ice Crystal Ball: Physical Science and Gas Expansion Demo
Another fun dry ice activity is to create a crystal ball. This one is a little difficult to do, but the rewards are worth it. Here is what you will need:
- bubble solution
- water (use tonic water and a black light to create a glow in the dark crystal ball for even more excitement)
- 500 ml beaker (a glass cup will work just as well)
- paper towel
- dry ice
Pour the water into the beaker, place a film of bubble solution around the top of the beaker, and add the dry ice. Wet the paper towel in the bubble solution and drag it across the top of the beaker to create a thin film covering the beaker opening. The carbon dioxide gas will fill create a bubble that resembles a crystal ball.
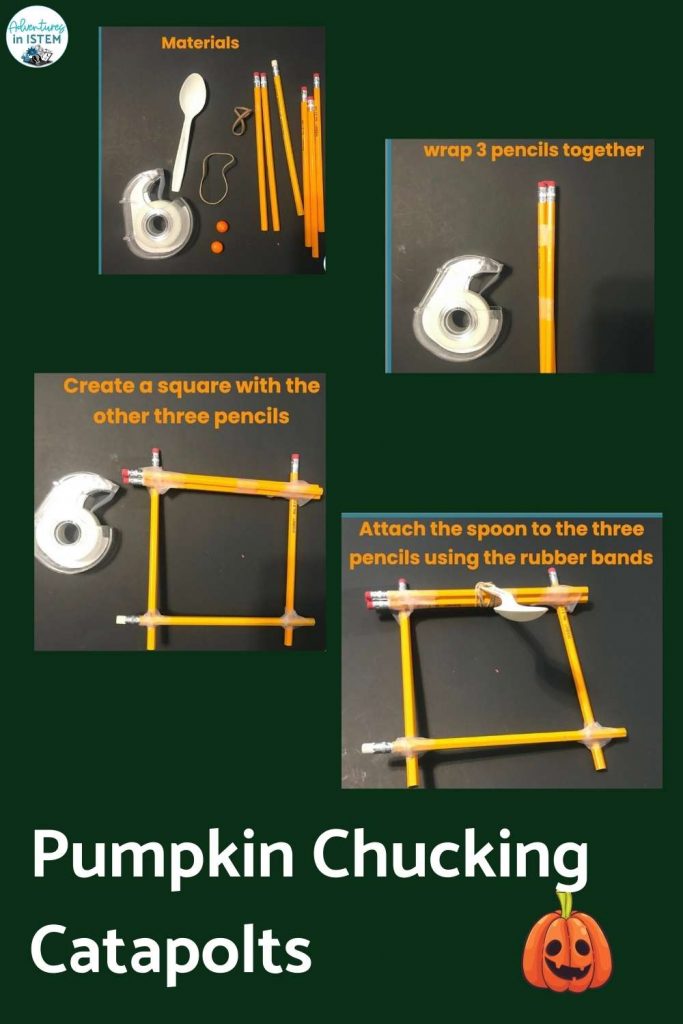
Pumpkin STEM Activities: Pumpkin Chunkin Engineering and Projectile Science
If you have never watched a pumpkin chucking contest, then you are missing out. The object is to create real-life catapults like mandolins and trebuchets and then use them to toss pumpkins at incredible distances. At the time of this writing, the last World Championship competition took place in 2019, with a new record being set for the Adult catapult. It launched the pumpkin 4,019 ft. That is more than 11 football fields. I have my students do a mini version of this. They learn about the history of catapults and do an online practice simulation. Then they create their mandolin or trebuchet and test it out with pumpkin-shaped peeps or pumpkin-shaped candy corn. They test for distance and accuracy. They then iterate their designs before the final competition. You can also take it one step further and put the top two catapults against each other. Have them create towers out of cups and see who can knock over the most cups in a given amount of time.
Pumpkin Science: Fall Density Experiment with Mass & Buoyancy
When you are learning about density, the common misconception is that heavy items sink and light items float. With this activity, that idea is proven incorrect. Here is what you will need:
- 3 different sizes of pumpkin
- 3 other squashes (example: butternut, acorn, spaghetti squash)
- Large bucket that can be filled with water and is larger than your largest pumpkin
Have students hold the pumpkins and the different squashes. Let them predict if the item will float or sink. Place the pumpkins and squash one at a time in the water and have students record the results. Then cut up one pumpkin and each of the other squashes. Cut them into cubes and separate some of the seeds. Again have the students hold the parts of the pumpkins and squashes and ask them to predict if they will float or sink. Then test it out. Let students come up with their ideas of why an object will float or sink.
Ghost Writing: Hidden Messages & Acid-Base Fall Science Chemistry Activities
Who doesn’t love a secret message that only the sender and receiver can read? You can wow your students by creating a secret message on a piece of paper that can only be revealed if the person knows the secret. For this to work, you will need a clear liquid, Qtip, and a spray bottle with the reveal solution. You will write your message on the paper using the Qtip and the clear liquid. Once the message dries, it will no longer be visible. For it to be revealed, you need to spray it with the reveal solution. Here are the different combinations that you might want to try.
- Combination 1: Vinegar for the writing, red cabbage water to reveal
- Combination 2: Ammonia for the writing, red cabbage water to reveal
- Combination 3: Sodium bicarbonate (baking soda) solution for the writing, grape juice to reveal
- Combination 4: Lemon juice for the writing, iodine solution to reveal
The key importance is that one of them needs to be an acid, and the other needs to be a base. You could also use acid or a base to write and then an indicator solution to reveal. You could have the students choose which solution they will write their secret word with and then have another student try and figure out how to reveal it.